❌ 1. Disable all antivirus on your windows
The thing is that any antivirus, seeing how something (cheat) is introduced somewhere (game) - starts to delete the cheat and block its introduction into the game
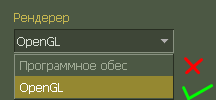
⚙️ 2. Change the rendering type from software to OpenGL
To change the rendering type, you need to go to the CS settings, select the "Video" section and find the "Render" option. In this section you can change the rendering type from software to OpenGL
🔍 3. Installing a normal cs build
There are different builds (protective (with protector), crooked or defective (for example, if the author of the build - some neverfix), anti-cheater (GSClient and similar))
All of these types of cs - can really interfere with the implementation of the cheat.
So below - I have left for you a couple of common builds on which the cheat works normally:
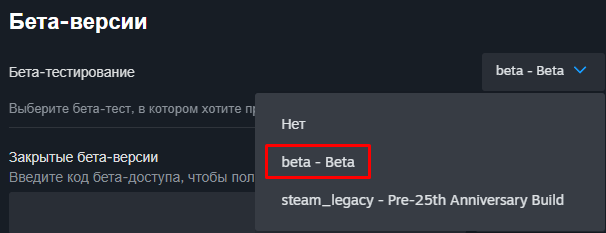
🔵✔️ 4. Enable beta testing for сs 1.6
This method is suitable for those who have a licensed CS 1.6 (purchased from Steam)
You must set beta testing in CS 1.6 properties for the cheat to work properly, as cheats don't work on the new version.
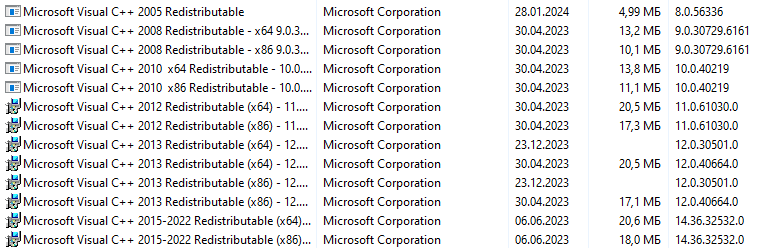
🔍 5. Installation of libraries on your windows (visual c+, net_framework)
You should have the same thing in the "Control Panel/ Programs/ Programs and Components" tab as in the screenshot:
🗑️ *6. Deleting the cheat folder
As you could see, this item has an asterisk - this means this item may be optional (you can try this item if the above items - did not help with your problem)
You need to go to the "AppData\Roaming" directory (press win+r on your keyboard and type "AppData" - go to the Roaming folder) and delete the "Furion Cheat CS 1.6" folder.
📌 Let's start with a preface: there is no ban that can't be bypassed.
Ban type, difficulty, and circumvention:
1. Ban on Steam ID + IP (fresh_ban) (easy)
Steam ID - is a player ID, which is usually used to store data (level, rating, privileges, etc)
To change the Steam ID, enable the function Steam ID spoofer in any cheat or protector, such as a protector Xguard it can be enabled with the command xg_emu_set random or xg_emu_set "ID" (to save data)
To change the IP address, enable VPN (if you have a static IP) or reboot the router by unplugging it for a while (if you have a dynamic IP) You can find out what type of IP you have by following the link - Recognize IP type
After changing Steam ID and IP - there will be no ban.
2. Ban on Steam ID + IP + tags in config.cfg (dopban) (easy)
Dopban - is a plugin (paid) that intercepts fresh_ban and writes you in config.cfg a label (random characters) in cvars/keys/bindings before the ban using the client_cmd function (sends you a command to the console via the svc_stufftext package) and checks your config.cfg for labels when you rejoin the server..
If the tag is there, you won't be able to log in even if you changed your Steam ID and IP.
To prevent dopban from tagging in config.cfg, you must enable svc_stufftext packet blocking, usually this feature is enabled by default in protectors.
Install protector or enable this feature in furion, go to Settings -> Protector -> Protect cs config (if you have version 1.795 or higher) or Misc -> Protector -> Protect cs config (if you have version lower than 1.795)
Once you enable svc_stufftext packet blocking - dopban will become helpless garbage, you will only have to change your Steam ID and IP (see the first point)
I would also like to add that using the client_cmd function that the dopban plugin uses, you can break config.cfg or clog up your disk with screenshots, so be sure to enable the svc_stufftext packet blocking feature :)
3. Ban on cookie (dopban) (easy)
What is DopBan and what he can do with CS - we partially discussed in the previous paragraph, but these are not all the features of this plugin.
It has a function for cookie bans, but it is often not enabled by the scoofs (server creators) (don't know how to)
Cookies – are small text files that are saved on a user's computer or device when visiting a website/server.
Now you know what cookies are and that they can be sent to your browsers when you access the server, specifically through the MOTD window.
In order to DopBan Couldn't shove a cookie in your browser - turn it on MOTD block function in cheat (if you are using Furion - this function is located in the tab Misc->Misc->Motd block)
If, however, you've changed IP и Steam ID (first point), cleaned the config from tags or you had the block function enabled svc_stufftext package (protector) (second point), changed your nickname (at the end of the article you can read why you should do it) and the ban still remains - it means you have a cookie ban.
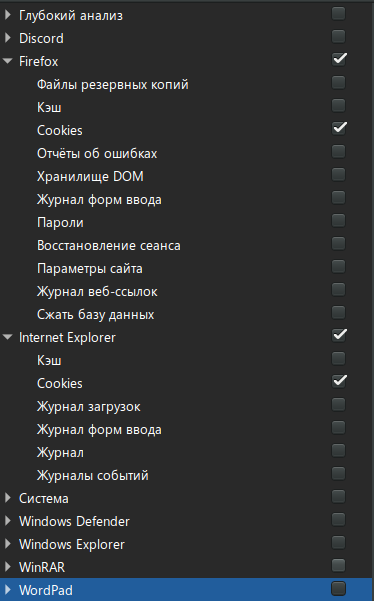
In order to bypass the cookie ban - download the program BleachBit (download)
Run it and uncheck all the checkboxes except for Cookies in all browser tabs.
You can see on the screenshot how to tick the checkboxes, after ticking the checkboxes - click the button Cleansing, keep in mind that you'll be deleting all passwords and site settings.
And don't forget to delete the folder htmlcache if you have a Steam version of CS
This point concludes.
4. Subnet ban (medium)
Subnet - network part.
Example: 77.73.69.0/24 is a subnet with IP addresses 77.73.69.1 through 77.73.69.254.
If the subnet 77.73.69.0 (where 0 is the already banned part) is banned, you will not be able to play with IP addresses whose subnet is "77.73.69".
That is, you can't play with IP addresses 77.73.69.15, 77.73.69.37, 77.73.69.125, and so on, because they all have the same subnetwork.
How do I know if a subnet has been blocked? - When you connect to the server, you will have no downloads, as if you have no internet connection.
How to bypass the blockage? - Reconnect to the VPN until it gives you a new subnet, or change region/country.
Don't forget to do the first and second item (if dopban is installed on the server)
More info
There are still a couple more ban types (two left) and they're hard to get around already.
I'd tell you what types they are, but I can't, since server creators will run to put them on their servers, you don't want that, I guess)
By the way, if suddenly you are sure that 100% bypassed the ban, but for some reason the ban remains and you can not play - just change your nickname (this is not rofl)), it sometimes happens, rarely true, but it happens.
🤔 What is FPS and why it gives an advantage more in CS 1.6 than in CSS/CS:GO/CS 2
FPS (frames per second) in CS 1.6 gives you an advantage in gaining speed due to the unique mechanics of the engine GoldSrc.
In CS 1.6/CSS/CS:GO/CS 2 you can get speed from strafes (synchronized movement of the keyboard and mouse in the same direction), but CSS/CS:GO have a Source Engine that doesn't allow you to get extra speed at the expense of FPS counts
That is, in CS 1.6 FPS + strafes = a lot of speed, but only if the server has set the sv_airaccelerate cvar (acceleration factor in the air) at least 50, preferably 100 or higher.
When creating a server, sv_airaccelerate defaults to 10, which doesn't allow you to get speed at the expense of streams, even if you have 999 fps.
The value of sv_airaccelerate is 100 or higher most often on deathrun and hns modes, but on any public or any other mode sv_airaccelerate can also be higher than the default 10, it all depends on the server creator and whether he changed the value of this cvar or not.
What is FPS and sv_airaccelerate we learned, and that a value of 100 or higher is most common on hns and deathrun servers.
On deathrun servers, there is usually no fps limit and you can play with any number of fps, while on hns servers, fps is usually limited to 100.
On hns servers they install fps detectors, and if your fps is over 100, you will be kicked.
🤔 How to bypass FPS detectors
Bypassing FPS on hns servers will give an incredible advantage, below is how you can bypass one of the detectors:
1. If a packet detector is installed on the server svc_sendcvarvalue/svc_sendcvarvalue2 - this packet can be blocked, so that when the detector checks the values of the cvars fps_max/fps_override/developer through the packet, it won't receive the packet and will let you through under the guise of a valid player.
To enable packet blocking svc_sendcvarvalue/svc_sendcvarvalue2 - you need to enable the function Sandbox cvars, in furion, it's under the tab Settings -> Protector -> Defense cfg CS (if your version is 1.795 or higher) or Misc -> Protector -> Defense cfg CS (if your version is below 1.795)
2. If the server has an old and outdated detector that kicks you by using the disconnect command in the console, you can block the sending of this packet through the protector.
To do this, go to the Settings tab -> Protector -> Defense cfg CS (if your version is 1.795 or higher) or Misc -> Protector -> Defense cfg CS (if your version is below 1.795)
If the kick occurs through the svc_disconnect packet, you can also block it by going to the Console tab and checking the Block svc_disconnect message checkbox.
That's the end of the bypass, if the detector works in other ways, you won't be able to bypass it :(
Go to the Misc tab and enable fake ping, increase the value to 400-500.
After that, you will appear to go back for about 5 seconds and hit the player model that was there, even though they are not there anymore (time jumps)
Additionally, you can enable visibility of this model, which moves behind the enemy.
To do this, go to the Visuals -> Chams and glow tab and enable the Backtrack position feature.
🎬 You can also watch the video tutorial below.
📢 Introduction
By stealing someone else's Steam ID, you can get their level, ammo, bonuses, rank, privileges (not always) I recommend watching the video at the end of the article if you find it easier to watch than read.
😕 Nuances:
1. The stolen Steam ID will only work for two weeks and can only be stolen from Steam players, not from NonSteam players
2. You will not be able to play on the server if another player with the same Steam ID (author or another thief) is currently playing - due to Drpoto/Reunion
3. You must see the player's avatar whose Steam ID you are planning to steal or have already stolen. If you don't see it, you will be kicked without reason in 5-15 seconds. If you see it, you will be kicked in 2-3 minutes or not kicked at all (luck of the draw)
4. If privileges are linked by IP - hacking will not work
🪶 How Steam IDs were stolen before
Previously, you could steal a Steam ID by simply moving the protector CtShield into the root folder of CS 1.6, typing the command ct_emu_set "Steam ID" in the console, and then rejoining the server.
This method no longer works due to being outdated at the current time.
⚙️ Server Preparation
First, you need a hosting to create a server.
You can choose from paid (MyArena, CssServ, and others) as well as free, for example, like Castle Host.
After creating the server:
Set the value sag031 (for example) for the rcon_password cvar, and the value 0 for sv_lan in the cstrike/server.cfg file, and also change the server name through the hostname cvar.
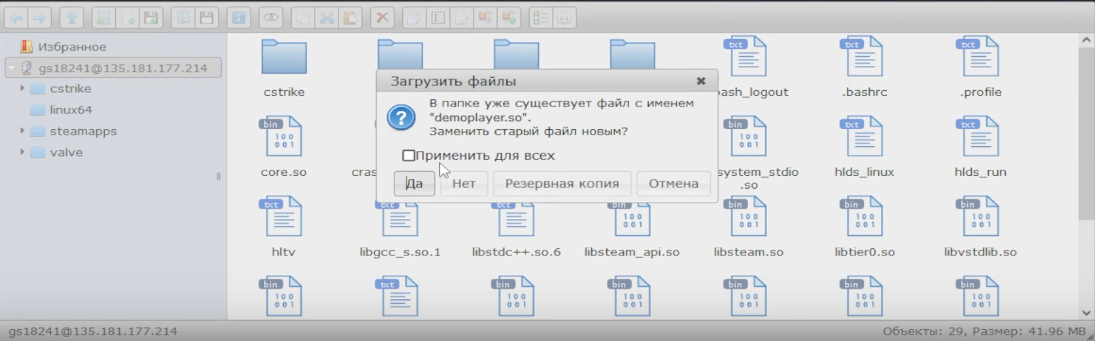
After setting the cvar values, you need to install the necessary modules on the server, you can download them at the link https://disk.yandex.ru/d/G0DgvXet6xE4ag, installation is very simple - move the contents of the archive to the root of the server with replacement.
💧 What you have downloaded: (you can skip this information, as it is not necessary to know)
Metamod module (needed for plugin/module operation)
Reunion module (needed for allowing non-steam players to the server. You can actually not install this module, as we only need Steam players. Forget it or go to the plugins.ini file located at cstrike/addons/metamod/ and delete the line linux addons/reunion/reunion_mm_i386.so)
TicketDumper module (obtaining the necessary "Steam account data dump file" that we can later assign to ourselves through the cheat function, thereby obtaining someone else's Steam ID)
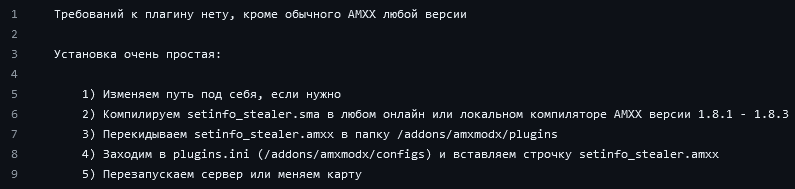
Setinfo stealer plugin (steals player passwords, requires AMXX, find out online how to install, it's quite simple)
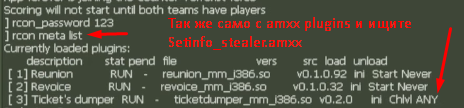
Don't forget to check if you have correctly installed the modules on the server using the command meta list, and check if you have correctly installed the plugins using the command amxx plugins.
You should see your modules/plugins in the list.
If they are not there or if there is a substring "Error/Bad/Not loaded/Pause" or others - it means you have installed something incorrectly.
💭 How to invite a player to the server
Change the hostname cvar value to a related name with the game mode and map, to get the victim's attention, and entice them to the server under various pretexts.
After the victim enters the server, we automatically get their data (ticket and password)
🏴☠ Getting player data
After you have installed everything and the victim has joined the server, go to the cstrike/ticketsz/ folder.
If you have the latest ticket file, for example, 2023-12-25_14-16-24_76561199465566779.dat, then 76561199465566779 is the Steam ID 64 that we need.
By pasting it into a special website for searching for an account by Steam ID/Steam ID 2/Steam ID 64/URL, we can find out who exactly is the owner of this ticket based on their Steam avatar.
After obtaining the ticket, go to the cstrike/addons/amxmodx/configs/ folder and open the setinfo_stealer.log file.
Look for your victim there and get their passwords (_pw, _password, _pass)
After obtaining the ticket and password, we no longer need any other data.
🏁 Assigning someone else's data to ourselves (end)
Move the ticket to a convenient folder, then enter a command in the console to set the victim's password (setinfo _pw "password" or setinfo _password "password", or setinfo _pass "password")
Inject Furion or ExtraMirror.
If you want to use ExtraMirror, you will find a working version without crashes, enter the command set_ticket "Path to the victim's ticket" in the CS 1.6 console (without Cyrillic).
If you want to use Furion, go to Misc -> Misc tab and find the Steam ID spoofer option, select Ticket below and enter the ticket path in Path to the ticket.
That's it, we have assigned someone else's Steam ID to ourselves through the cheat function and passwords through the console command setinfo "type password" "password".
🎬 Video tutorial:
🧾 Main theoretical part (what are cvars, binds + syntax, aliases)
In CS 1.6, there are variables (also known as "cvars") and commands that are executed but not stored anywhere.
Binds - binding a specific action to a key (you can only assign a press, holding down the key is not possible) Binds allow you to execute commands or change variable values.
Syntax: bind "key" "action" (where "key" is your key, "action" is your action)
Aliases work similarly to binds but provide more flexibility (examples will be given below)
On most servers, you can get banned by anticheat for "cheating" aliases (a warning that using "cheating" aliases is ineffective and easily detected compared to cheat function)
🧾 Theoretical part (example of bind, (cvars, changing which can increase FPS))
For example, the command bind "SPACE" "+jump" written in the console - binds the command "+jump" to the space key.
Every time you press space, a packet with the "+jump" command is sent to the server, resulting in your character jumping.
Now let's move on to simple aliases, we won't consider complex options as they are not very relevant in 2024.
For example, you enjoy playing on servers with "Deathrun" mode, and you probably know the benefit of higher FPS (if you don't know - read the article "🤔 How to bypass FPS detectors")
CS 1.6 is poorly optimized, it simply does not allow your computer to work at a normal level, which leads to low FPS even on a decent computer, because the more loaded the computer, the more FPS it will output.
Therefore, various methods are used to increase FPS in the game, it can be both console methods (various configs, aliases) and cheat methods (FPS skipper)
The best option for increasing FPS, of course, is cheat, but if you don't want to use cheats, you can slightly increase your FPS without software assistance, but with console manipulations
In CS 1.6, there are some cvars for increasing FPS, they do not compare with FPS skippers provided by cheats, but you have decided not to use cheats.
Cvars, changing which can increase FPS:
hud_draw - cvar responsible for showing HUD (health, armor, money, timer, server part, etc.) on the screen (1 - show, 0 - do not show) cl_weather - cvar responsible for showing weather effects (1 - enable, 0 - disable) cl_himodels - cvar responsible for enabling high-quality player models (1 - enable, 0 disable) r_detailtextures - cvar responsible for enabling HD textures of the map (if the map author added them) (1 - enable, 0 - disable) r_drawviewmodel - cvar responsible for showing weapon (1 - enable, 0 disable) r_drawentities - cvar responsible for showing map entities (1 - enable, 0 disable) gl_fog - cvar responsible for showing fog on the horizon (1 - enable, 0 - disable)
gl_picmip - cvar responsible for texture quality, the higher the value, the more pixels on the textures (add to config.cfg, it will not change dynamically in the game) (0 - default value, 3 - maximum value)
gl_texturemode - cvar responsible for texture quality (almost like gl_picmip, but can be changed dynamically) (GL_NEAREST_MIPMAP_NEAREST - poor graphics, GL_LINEAR_MIPMAP_LINEAR - default value)
⭕ Practical part (writing your own binds and aliases)
Let's say you need to increase FPS by changing cvar values, but you don't want to constantly play with poor graphics and without HUD - there is a solution, which involves creating two binds that can be used when playing a deathrun map or participating in a duel, etc.
The first bind will set cvar values to low, thereby increasing your FPS.
The second bind will set cvar values to default, returning your original values.
As we can see, the syntax is easy to understand, we write the keyword "bind", in quotes we specify our key, and in the next quotes the string in which the action will be executed, using ";" we can perform several actions, not just one.
We can also notify ourselves if we have pressed the bind or not using the "spk" command.
In this case, the binds will look like this:
Now we have the ability to dynamically enable and disable FPS boost in the game through our two binds, but it would be much more convenient to use just one button instead of two.
We can achieve this using an alias, here is an example that will replace our two binds with one button, toggling FPS boost on press (hold)
              alias Cvar_FpsBoost_Hold "BoostOn"

              alias BoostOn "hud_draw 0; cl_weather 0; cl_himodels 0; r_detailtextures 0; r_drawentities 0; gl_texturemode GL_NEAREST_MIPMAP_NEAREST; spk activated; alias Cvar_FpsBoost_Hold BoostOff"

              alias BoostOff "hud_draw 1; cl_weather 1; cl_himodels 1; r_detailtextures 1; r_drawentities 1; gl_texturemode GL_LINEAR_MIPMAP_LINEAR; spk deactivated; alias Cvar_FpsBoost_Hold BoostOn"

              bind "key" "Cvar_FpsBoost_Hold"
Here's the same alias, but it works through holding down the button (toggle)
How to set up these aliases? - it's very simple.
You need to go to the game folder, specifically to cstrike, and create aliases.cfg, paste the aliases you need there and save it.
Then go to config.cfg and write exec aliases.cfg at the bottom and also save it.
After that, you can assign the alias to a button through a bind.
🍀 A Couple of Useful Binds/Aliases
bind "MWHEELUP" "+jump;wait;-jump" - improved bhopping (gets banned on most HnS servers) bind "MWHEELDOWN" "+duck;wait;-duck" - improved strafing (gets banned on most HnS servers) bind "e" "+use;wait;-use" - makes it easier to use map buttons (useful for speedrunners) bind "key" "deagle;secammo" - buy deagle and ammo bind "key" "hegren;flash;sgren;flash" - buy all grenades
Alias for changing hand position (hold)
          alias "Hand" "Right"

          alias "Right" "cl_righthand 1; alias Hand Left"

          alias "Left" "cl_righthand 0; alias Hand Right"

          bind "key" "Hand"
Alias for enabling microphone, you can simply press the button once (hold) and the microphone will be always active
          alias "Voice" "On"

          alias "On" "+voicerecord; alias Voice Off"

          alias "Off" "-voicerecord; alias Voice On"

          bind "key" "Voice"
You can easily find other binds/aliases on the internet, the article is complete.


.jpg)
 2.png)
